
Hey there, fellow adventurer! If you’ve been anywhere near the outdoor forums or gear shops lately, you’ve probably heard the buzzword floating around: Tarnplanen. At first, I’ll admit, I thought it was just some fancy German name for a basic tarp. Oh, how wrong I was.
After a particularly soggy camping trip last spring—where my standard blue tarp ripped on a branch and left me sleeping in a puddle—I decided to see what the hype was about. I picked up my first camouflage tarp, and honestly? It was a game-changer.
Whether you’re a hardcore bushcraft expert or just someone who likes a dry picnic in the woods, a good Tarnplanen is the piece of gear you didn’t know you were missing. In this guide for 2026, we’re going to break down exactly what it is, how to pick the right one, and how to use it to level up your time outside.
What Exactly is a Tarnplanen? (And Why You Need One)
Let’s start with the basics, because the term gets thrown around a lot. Tarnplanen (pronounced “tarn-plaa-nen”) comes from the German words Tarn (camouflage) and Planen (tarpaulin) . So, literally, it means “camouflage tarp.”
But in the outdoor world, it means so much more than that. It’s not just the flimsy plastic sheeting you grab from the hardware store. A true Tarnplanen is a heavy-duty, weather-resistant, and often ripstop fabric sheet designed to blend into natural environments while protecting you and your gear from the elements .
Think of it as the Swiss Army knife of shelters. It keeps you dry, blocks the wind, hides you from view (if that’s your thing), and can be set up in a dozen different ways. In 2026, with lightweight gear being more important than ever, these tarps have become the unsung heroes of the backpacking world .
Top Reasons to Ditch Your Tent (Sometimes)
I love my tent, don’t get me wrong. But there are days when I look at my pack weight and wish I could shave off a few pounds. That’s where a Tarnplanen shines. Here is why so many hikers are making the switch for specific trips:
-
Incredible Versatility: You aren’t stuck in one shape. You can pitch it high as a sun shade, low as a storm shelter, or turn it into a lean-to .
-
Weight Savings: A high-quality, ultralight Tarnplanen can weigh a fraction of a tent. We’re talking about saving precious ounces (or even pounds) for your knees and back.
-
Protection from the Elements: Good ones are fully waterproof and offer UV protection. I sat under mine during a surprise mountain hailstorm last summer, and I stayed bone-dry .
-
Connection with Nature: When you sleep under a tarp instead of a tent, you’re still outside. You hear the owls, feel the breeze, and see the stars. It’s a much more immersive experience.
How to Choose the Right Tarnplanen in 2026
Okay, so you’re sold on the idea. But walking into a shop or scrolling online can be overwhelming. There are a million patterns, sizes, and materials. Here’s how I narrow it down, and how you can too.
1. Material Matters: Nylon vs. Polyester
This is the big one. Most Tarnplanen are made from either ripstop nylon or polyester .
-
Nylon: It’s super strong for its weight and packs down very small. However, it absorbs water when wet (making it sag) and can degrade in strong UV rays over time.
-
Polyester: This is usually my go-to for hiking. It doesn’t sag when it gets wet, handles sunlight much better, and is generally more user-friendly for beginners .
2. Size and Weight
For solo hiking, I find that a 2.5m x 3m tarp is the “Goldilocks” size. It’s big enough to give you coverage and a small cooking area but light enough to carry easily (usually around 400-600 grams). If you’re camping with a buddy, look at 3m x 3m or larger .
3. The Camouflage Pattern
Do you need camo? Not always. But if you’re a wildlife photographer, a hunter, or someone who likes “stealth camping” away from crowded trails, the pattern is vital .
-
Forest: Greens, browns, and blacks for wooded areas.
-
Desert/Mountain: Tans and light browns.
-
Digital Camo: Pixelated patterns that work well in a variety of mixed environments .
My personal opinion? I love the look of a woodland Tarnplanen. It just feels right when you’re deep in the pine trees.
My Go-To Setup: A Personal Anecdote
I remember my first real test with a Tarnplanen in the White Mountains. I was trying to set up a simple “A-frame” shelter, and let’s just say it looked more like a kite that had crashed. The wind was picking up, and I was getting frustrated.
Then, an older hiker camped nearby came over with a coffee in his hand. He showed me the “trucker’s hitch” knot and explained that you don’t need to pull it drum-tight right away. “Let the fabric breathe a little,” he said. He adjusted the angle so the low side was facing the wind, and suddenly, my shelter was solid as a rock.
That night, it poured rain. And I stayed cozy, listening to the drops hit the fabric inches from my face. That experience taught me that your Tarnplanen is only as good as your setup skills.
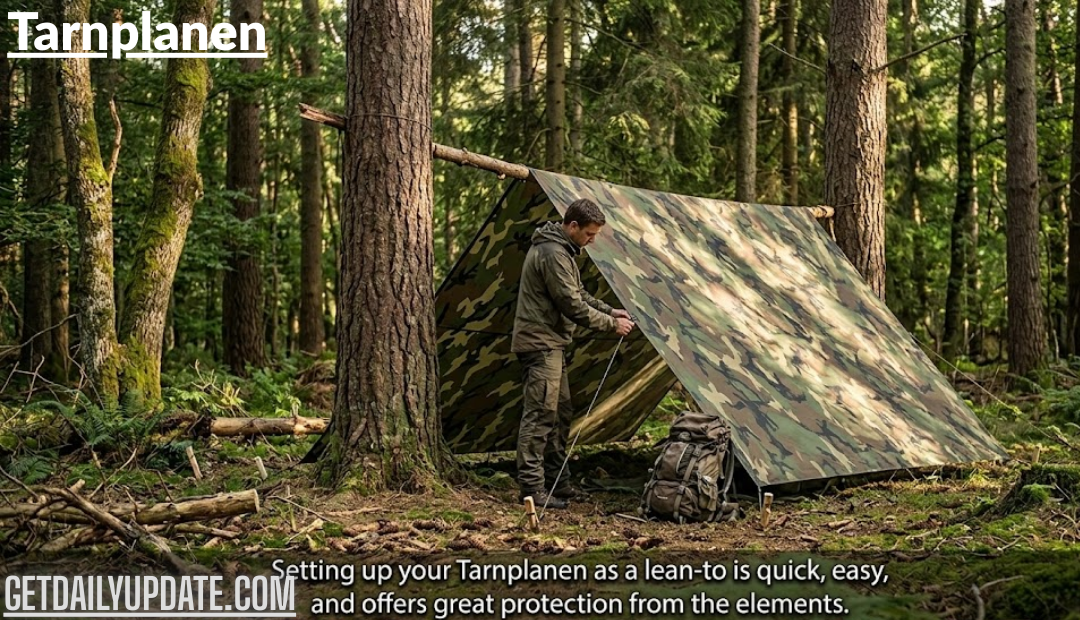
Step-by-Step: How to Set Up Your Tarnplanen
You don’t need to be a boy scout to figure this out, but a little know-how goes a long way. Here is a simple method for a basic lean-to, perfect for a quick overnight hike.
-
Find Your Spot: Look for two sturdy trees about 10-12 feet apart. Make sure the ground underneath is clear of rocks and sticks and is slightly sloping so water runs away from you.
-
Run the Ridgeline: Tie a strong piece of paracord between the two trees about chest-high. This is the spine of your shelter.
-
Drape the Tarp: Throw your Tarnplanen over the ridgeline. Make sure it’s uneven—have more tarp on one side (the side you’ll sleep under) and less on the other.
-
Stake It Out: Use the grommets (the metal rings) on the corners to stake down the long side to the ground. This creates your back wall.
-
Prop It Up: On the open side, use trekking poles or long sticks to prop up the front corners. Stake those guy lines out at an angle .
-
Adjust: Make sure the fabric is taut so wind doesn’t make it flap all night.
Maintenance: Make It Last
You’ve invested in a quality piece of kit, so treat it right. I learned the hard way by stuffing a wet tarp into my backpack and pulling it out a week later to find mildew spots. Gross.
-
Dry It Out: Seriously, always let your Tarnplanen air dry completely before storing it at home. This prevents mold and rot .
-
Clean Gently: If it gets muddy, hose it off or wipe it with a sponge and mild soap. Harsh detergents can strip the waterproof coating .
-
Check the Seams: Every few trips, look at the stitching and the corners. If you see a loose thread, fix it before it becomes a big rip.
-
Storage: Fold it loosely. Folding it the exact same way every time can cause the material to weaken along those lines. I just stuff mine into a snake skin or a large bag .
Conclusion: Your 2026 Adventure Awaits
If you are planning your hiking and camping trips for 2026, I highly recommend adding a Tarnplanen to your gear list. It’s lightweight, incredibly useful, and connects you to the environment in a way that four nylon walls never could. Whether you are using it as a ground sheet, an emergency shelter, or your primary roof, it’s the ultimate tool for going light and staying protected.
If you want to read more information, visit.


Leave a Reply